Introduction
In present day virtual age, electronic gadgets have end up an essential a part of our lives, which include musical devices. One fascinating task for music fans and electronics hobbyists is building a easy electronic piano or organ the use of an astable circuit. An astable circuit is a sort of oscillator that generates a non-stop and symmetrical output signal. By leveraging the standards of this circuit, we are able to create a primary yet enjoyable musical device.
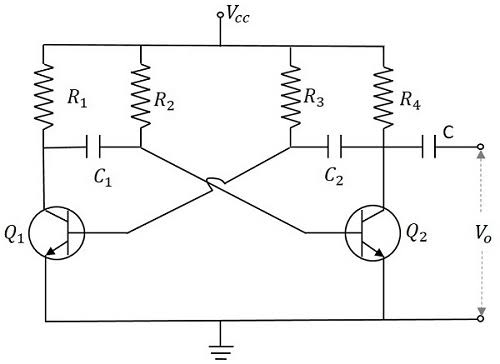
Basic Astable topology diagram
In this article, we will guide you through the procedure of building your very own electronic piano or organ the usage of an astable circuit, imparting a fun and educational assignment for fans of all ages.
Understanding the Astable Circuit Before we dive into building the digital piano or organ, it’s essential to grasp the fundamentals of the astable circuit. An astable circuit is an association of digital additives that generates a continuous rectangular wave output without any stable nation.
It normally includes resistors, capacitors, and transistors. The key component in an astable circuit is the timing capacitor, which charges and discharges at a selected rate, figuring out the frequency of the output square wave.
By altering the values of resistors and capacitors, we can control the frequency and tone of the sound produced via the electronic instrument.
Gathering the Components To build a easy electronic piano or organ, you may want the following components:
1. Resistors: Depending to your preferred output frequency, pick out appropriate resistors.
2. Capacitors: Choose capacitors that match your desired tone and frequency range.
3. Transistors: NPN and PNP transistors are normally used in astable circuits.
4. Speaker: Pick a speaker that may produce the favored sound output.
5. Power Supply: Provide a voltage ranging from 9v to 12v supply in your circuit.
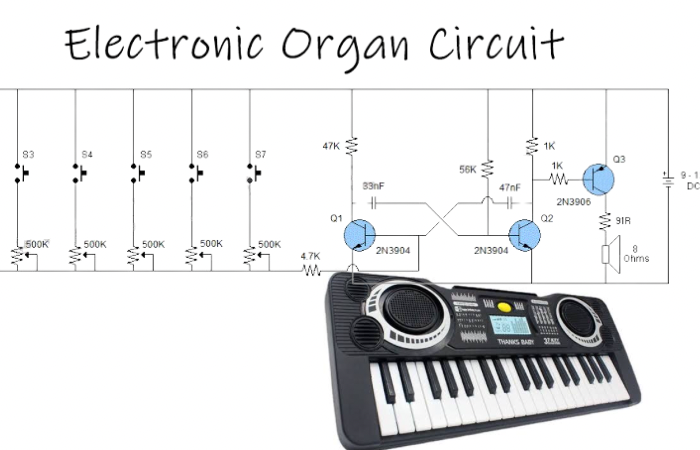
The electronic organ circuit

Section 3:
Building the Circuit To construct the digital piano or organ, comply with those steps:
1. Start via connecting the resistors and capacitors to form the astable oscillator circuit. Ensure you consult the datasheets and reference materials for your preferred components.
2. Connect the transistors to the oscillator circuit, making sure right polarity and orientation.
3. Attach the speaker to the output pins of the circuit. The speaker will convert the electrical alerts into audible sounds. Four. Connect the electricity deliver to provide a regular voltage to the circuit.
Section four:
Adding the Keyboard Now that your digital piano or organ circuit is complete, it is time to feature a keyboard interface. You can use a easy matrix keyboard, which includes a couple of switches organized in rows and columns.
Each switch corresponds to a particular observe or tone.
Connect the rows of switches to the output pins of the astable circuit, and join the columns to the ground. When a key is pressed, it completes a connection between a row and a column, triggering the corresponding be aware to play through the speaker.
Experimentation and Improvements With your electronic piano or organ absolutely practical, it is time to experiment and discover diverse possibilities.
You can fine-music the tone and frequency by means of adjusting the resistor and capacitor values. Additionally, recall adding volume controls, preserve alternatives, or maybe connecting the circuit to a MIDI interface for further versatility.
Conclusion
Building a simple electronic piano or organ using an astable circuit is a captivating assignment that combines the geographical regions of track and electronics. It allows fanatics to delve into the principles of oscillator circuits while growing their personal musical tool. This DIY venture is an extremely good way to find out about electronics, circuitry, and sound manufacturing.