A battery level indicator is a helpful device to check how much charge is left in a battery. Frequently utilized in electronic gadgets run on batteries, for example, toys, spotlights, and controllers. One method for making a battery level indicator is by utilizing LEDs and Zener diodes. This article makes sense of how to making a basic battery level indicator with LEDs and Zener diodes.
To make a battery level indicator with LEDs and Zener diodes, you will require a couple of parts like a battery, Zener diodes, LEDs, resistors, breadboard, and jumper wires. A breadboard is a prototyping board that permits you to effortlessly interface and disengage electronic parts. Jumper wires are utilized to interface parts on the breadboard.
To begin, put the battery on the breadboard and interface its positive (+) and negative (- ) terminals to two distinct lines on the breadboard. Then, embed a 220-ohm resistor in series with each led. As far as possible the ongoing moving through the led and keeps it from wearing out. Interface the free finish of every resistor to an alternate line on the breadboard.
Associate the anode (positive) of the green Prompted the principal column of the main resistor and the cathode (negative) to the line close to it. Interface the anode of the yellow Prompted the line close to the cathode of the green Drove and the cathode to the column close to it. Interface the anode of the red Prompted the column close to the cathode of the yellow led and the cathode to the second line of the last resistor.
Place the Zener diodes in line up with each led. Interface the cathode of the 3V Zener diode to the column close to the cathode of the green led. Associate the cathode of the 6V Zener diode to the column close to the cathode of the yellow led. Associate the cathode of the 9V Zener diode to the line close to the cathode of the red led. Interface the anodes of every one of the three Zener diodes to the negative line of the battery. At last, interface a jumper wire from the positive terminal of the battery to the anode of the green led.
The circuit is presently finished. At the point when the battery voltage is beneath the Zener voltage of a specific led Zener pair, that led won’t illuminate. As the battery voltage increments and arrives at the Zener voltage of the Drove Zener pair, the led will illuminate, demonstrating the battery level. The green led shows that the battery is completely energized, the yellow led demonstrates that the battery is somewhat charged, and the red led demonstrates that the battery is practically unfilled.
In rundown, a battery level indicator with LEDs and Zener diodes is a basic yet viable method for checking the battery level of electronic gadgets. By utilizing different Zener diodes with various breakdown voltages, you can make a battery level indicator that can be redone to suit your requirements. The utilization of LEDs likewise gives a visual sign of the battery level, making it simpler to know when to supplant or re-energize the battery. With the right materials and a fundamental comprehension of electronic circuits, you can make a battery-level indicator that is both simple to utilize and useful.
Introduction to this project
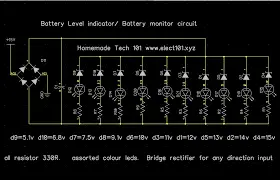
This post is about a battery level indicator or battery monitor circuit that can be implemented in some DIY projects where battery monitoring is essential.
the circuit consists of major components like
Bridge diode:
used to make a non-polarised input for the circuit which means you can connect the circuit to the battery in any direction
Resistors
The resistors are used in this circuit to reduce the current flowing to the led so that it won’t get burnt
LEDs :
They are the indicators that will show the voltage input level
Zener diodes
they are used to turn on each of the led anytime the input voltage reaches the Zener diode threshold volt
A capacitor
It is used for filtering the VCC voltage of the circuit
The basics of a 12v battery level indicator circuit
A battery level indicator circuit is a simple way to monitor the state of a battery. The circuit consists of a voltage regulator and a light-emitting diode (LED). When the battery voltage reaches a set level, the LED turns on. This simple circuit is perfect for applications where you need to know the state of a battery, but don’t need to control the battery’s power levels.
Diagram of the circuit
Testing the circuit in the video below
Conclusion
The battery level indicator or battery monitor circuit can be used in DIY projects like DIY inverter projects, DIY battery chargers e.t.c